Skip to content
FIREBALL IS NOW HERE!
How To: Headlight Restoration

How To: Headlight Restoration

Restore your vision

22nd July 2021 • Sam Gibbons • Exterior Care


Headlights can make or break a vehicle; but when they get really oxidised and yellowed how exactly do you bring them back? Today we have a VW Golf GTI with some heavily damaged lenses and will embark on a heavy restoration below step by step.

Time: 60-120 minutes
Difficulty: 6/10
Today's Vehicle: VW Golf GTI MK5

Products Used:
- Sandpaper Sheets - 1000, 2000, 3000 Grit
- Vibac Masking Tape
- Menzerna HC400 Heavy Cut
- RUPES D-A Fine Polish
- Lake Country Microfibre Cutting Pad
- Lake Country SDO Blue Polishing Pad
- Fireball Pirouette


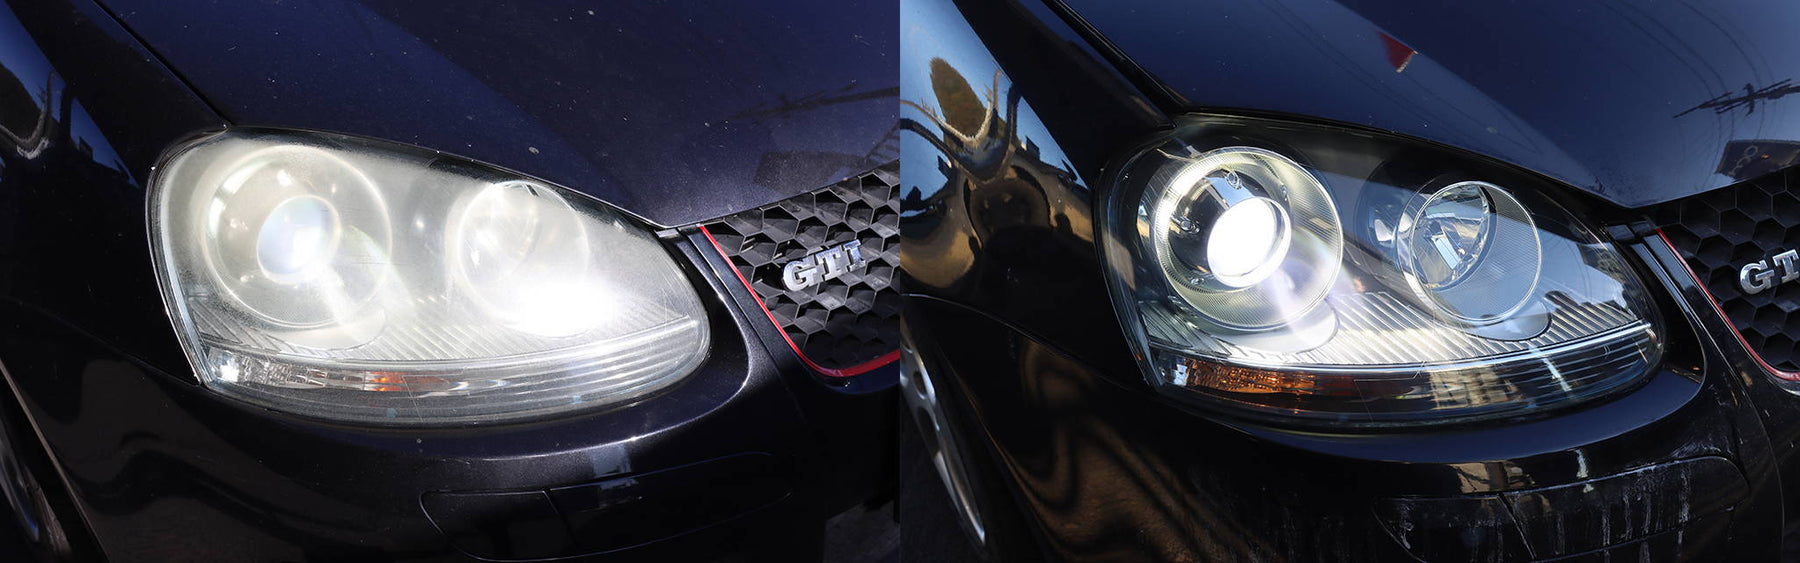
Most modern vehicles with plastic headlights have a clear lacquer layer from the factory that acts as a layer of protection to the plastic headlight housing. Often this layer will degrade over time and cause headlights to turn yellow, oxidised and sometimes appear to have micro-cracks and scratches on the surface. Luckily there is a way to fix this! Not only does this type of oxidation make your vehicle look unsightly but it can cause WOF failures and restrict vision at night.

Disclaimer/Initial Comments: In this guide we start with 1000 grit sanding sheets. You can start even lower; down to 600 grit - however as we don't range 600 grit we have opted to show the process using simply what we have available and to show that you can achieve an awesome result even with 1000 grit.

Removing the factory lacquer will make your headlights more susceptible to re-hazing and requires some regular maintenance of a light polish and sealant; however when headlights are as bad as the ones in this tutorial there isn't really any other option! Not all headlights require sanding so we recommend testing a heavy cutting compound first to see if you need to embark on a full restoration or not.

Click on the photos in this guide for an enlarged view.


Instructions

1) Start the process by thoroughly masking off the surrounding paint and trims around your headlight. Apply multiple layers if required so the sandpaper can't break through and damage the surrounding areas. Ensure the headlight is clean and dry first.

If you do not mask the bumper well enough you risk damaging the paintwork with the sandpaper. As you go through the process constantly check your masking to make sure it is still adequately covering the paint and trims.

Headlight Restoration: Mask Up

2) Start with a piece of the 1000 grit sandpaper wrapped around a sanding block of your choice. What you are wanting to achieve with the 1000 grit is to completely remove the damaged factory lacquer coating. This step is crucial. Wet sand with plenty of water in a straight line direct - EITHER vetically or horizontally. Do not mix directions (you'll see why in the next step). You are looking to start generating a slurry like you see on the image to the right. You know you've sanded enough when you can no longer see any more of the oxidised layer, cracks or yellowing.

Headlight Restoration: Sanding Slurry

After each section use a microfibre/terry towel to remove the excess slurry before continuing. It would be normal to use anywhere from 2-3 A4 sanding sheets depending on how bad the headlights were for this 1000 grit step. You should expect to spend up to 20 minutes performing this first 1000 grit step; moving to a new section of sanding sheet whenever you feel the abrasive is losing effectiveness.

3) Your headlight should now look similar to the image attached to the right. Next, you need to move to a finer grit to refine the 1000 grit scratches by using the 2000 grit sandpaper. You can follow the same sanding method as the previous step but with one crucial difference - sand in the OPPOSITE direction. If you sanded vertically before then sand horizontally (or vice versa). By doing this method you can visually see if you have successfully refined out the 1000 grit marks by looking for the vertical or horizontal grain in the plastic.

Headlight Restoration: 1000 Grit Sanded

4) Your headlight should now look similar to the image attached to the right. Next, you need to move to a finer grit to refine the 2000 grit scratches by using the 3000 grit sandpaper. Once again; follow the same sanding methods but again alternate the direction of sanding vertically to horizontally (or vice versa) so you can ensure you have successfully refined the 2000 grit marks out. You should have visually noticed the headlight getting much clearer at this point.

Headlight Restoration: 2000 Grit Sanded

This is the final sanded result. Have a good look to ensure you are happy with the level of defect removal before continuing to the final polishing steps.

5) Next step you want to refine out the sanding marks using a heavy cutting compound on a polishing machine. If you don't have a polishing machine you can perform this step by hand; it will just take longer and require more elbow grease. After performing a heavy cut the headlight plastic should look clear and free from defects.

Headlight Restoration: 3000 Grit Sanded

Once the headlights are compounded move down to a finer polish with a fine pad to refinish the plastic to a high gloss shine. After performing this the headlight will be clear and free from defects!

We sealed these headlights with Fireball Pirouette SiO2 Ceramic Spray.

Headlight Restoration:
50/50 Polished

Headlight Restoration:
Compounded

Headlight Restoration:
Polished & Sealed

Voila!

UCC Final Notes:
- We have sealed these headlights using a SiO2 Ceramic Spray Sealant. You can also use a synthetic sealant or ceramic coating to seal them as well. The better the sealant the longer the result will last. For the best possible result you can look to get the headlights clear coated or wrapped in paint protection film.

Everything you need to complete this how-to guide yourself can be found below. We love educating and assisting our customers - so for all other enquiries or help with other projects you have please don't hesitate to get in touch on our contact page.


Previous article Maintain Your Microfibres
Next article Has the water tap dried up? Water-less washing - fact or fiction?

Leave a comment

Comments must be approved before appearing

* Required fields